![[Spring] Google STT(Speech-to-Text) 서비스 사용하기](https://img1.daumcdn.net/thumb/R750x0/?scode=mtistory2&fname=https%3A%2F%2Fblog.kakaocdn.net%2Fdn%2FTz5nt%2FbtsIiQteXzf%2FgIz3glEcfiujsEyhqLI8F0%2Fimg.png)
구글 Solution Challenge STRecording 프로젝트의 메인 기능 중 하나로,
음성 파일을 텍스트로 변환하는 기능을 구현하였습니다.
STT(Speech-to-Text)
GCP(Google Cloud Platform)에서 제공하는 서비스 중 하나인 Speech-to-Text API는 오디오 파일을 텍스트로 변환해 줍니다. STT는 다음과 같은 특징을 가지고 있습니다.
- 앱에 Speech-to-Text 기능을 간편하게 추가
- 오디오 파일 또는 실시간 오디오 스크립트 작성
- 125개 이상의 언어 지원
- AI를 사용해 동영상 자막 생성
더욱 자세한 내용은 공식 문서를 통해 확인하실 수 있습니다.
사전 준비
0. 프로젝트를 생성하고 결제 계정을 등록
1. 이후 서비스 계정을 생성
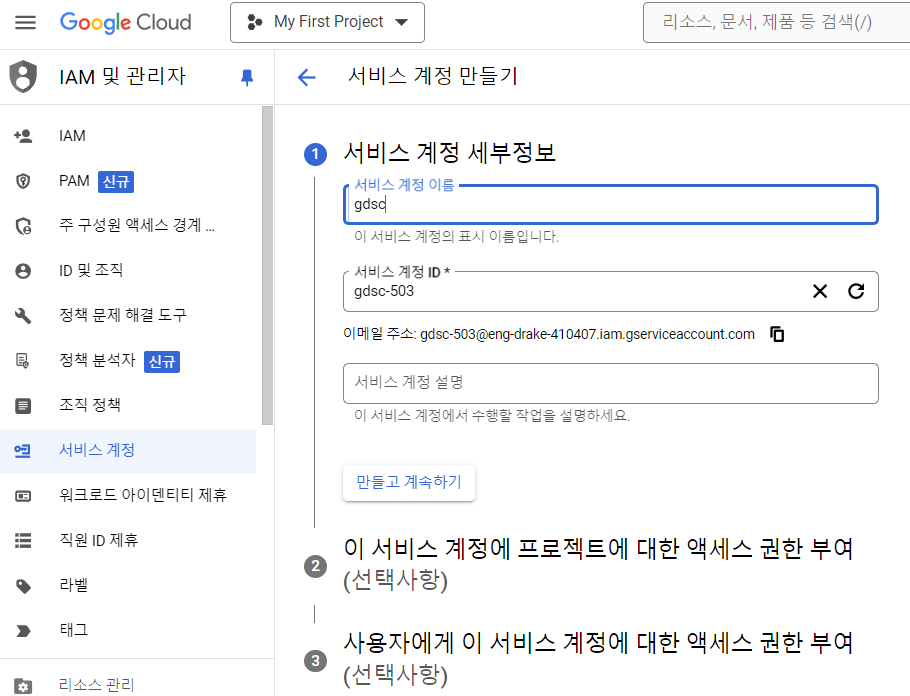
2. 서비스 계정 생성 후, 키 관리를 선택

3. 키 추가에서 '새 키 만들기'를 선택 후, JSON 유형의 비공개 키를 생성

위 과정을 마치면 사전 준비가 완료됩니다.
코드 작성
STT문서를 보면 '스트리밍 입력의 오디오를 텍스트로 변환', '긴 오디오 파일을 텍스트로 변환', '짧은 오디오 파일을 텍스트로 변환' 등 다양한 기능을 지원합니다. 저는 이 중 '짧은 오디오 파일을 텍스트로 변환' 기능을 사용하였습니다.
1. 클라이언트 라이브러리 설치 (공식 문서)
// Google Speech To Text
implementation 'com.google.cloud:google-cloud-speech:4.28.0'
2. 프로젝트의 resources 폴더에 위에서 발급 받은 JSON 키(stt.json) 저장

3. yml파일에 STT 환경 변수를 설정
spring:
  cloud:
    gcp:
      credentials:
location: classpath:stt.json- credentials: GCP 자격 증명과 관련된 설정
- location: 자격 증명 파일의 위치를 지정
4. Config 파일 작성
import com.google.auth.oauth2.GoogleCredentials;
import com.google.cloud.speech.v1.SpeechSettings;
import com.google.cloud.speech.v1.stub.SpeechStubSettings;
import org.springframework.beans.factory.annotation.Value;
import org.springframework.context.annotation.Bean;
import org.springframework.context.annotation.Configuration;
import org.springframework.core.io.Resource;

@Configuration
public class GoogleCloudConfig {

    @Value("classpath:stt.json")
    Resource gcsCredentials;

    @Bean
    public SpeechSettings speechSettings() {
        try {
            return SpeechSettings.newBuilder()
                    .setCredentialsProvider(() -> GoogleCredentials.fromStream(gcsCredentials.getInputStream()))
                    .build();
        } catch (Exception e) {
            throw new RuntimeException(e);
        }
    }

    @Bean
    public SpeechStubSettings speechStubSettings() {
        try {
            return SpeechStubSettings.newBuilder()
                    .setCredentialsProvider(() -> GoogleCredentials.fromStream(gcsCredentials.getInputStream()))
                    .build();
        } catch (Exception e) {
            throw new RuntimeException(e);
        }
    }

}
5. Controller 파일 작성
import java.io.IOException;

import org.springframework.beans.factory.annotation.Autowired;
import org.springframework.http.MediaType;
import org.springframework.web.bind.annotation.PostMapping;
import org.springframework.web.bind.annotation.RequestMapping;
import org.springframework.web.bind.annotation.RequestParam;
import org.springframework.web.bind.annotation.RestController;
import org.springframework.web.multipart.MultipartFile;

import com.example.solutionchallenge.app.common.dto.response.ResponseDto;
import com.example.solutionchallenge.app.common.dto.response.ResponseUtil;
import com.example.solutionchallenge.app.stt.service.SpeechToTextService;

@RestController
@RequestMapping("/stt")
public class SttRestController {

    @Autowired
    private SpeechToTextService sttService;
    /**
     * 오디오 파일을 받아서 텍스트로 변환하여 반환
     */
    @PostMapping(value = "", consumes = MediaType.MULTIPART_FORM_DATA_VALUE)
    public ResponseDto<String> handleAudioMessage(@RequestParam("audioFile") MultipartFile audioFile, @RequestParam("os") String os) throws IOException {
        int frequency = (os.equals("ios")) ? 48000 : 44100;
        String transcribe = sttService.transcribe(audioFile, frequency);
        return ResponseUtil.SUCCESS("변환에 성공하였습니다.", transcribe);
    }

}
클라이언트로부터 오디오 파일과 휴대폰 OS(ios, android) 정보를 받습니다.
기종을 나눈 이유는 iOS의 경우 샘플링 주파수를 48000Hz로 설정하면 에러가 발생하지 않기 때문입니다. (Android는 디폴트 값인 44100Hz를 사용합니다.)
이후, SpeechToTextService를 통해 오디오 파일을 텍스트로 변환하여 반환합니다.
6. Service 파일 작성 (공식 문서)
import java.io.IOException;

import org.slf4j.Logger;
import org.slf4j.LoggerFactory;
import org.springframework.beans.factory.annotation.Autowired;
import org.springframework.stereotype.Service;
import org.springframework.web.multipart.MultipartFile;

import com.google.cloud.speech.v1.RecognitionAudio;
import com.google.cloud.speech.v1.RecognitionConfig;
import com.google.cloud.speech.v1.RecognizeResponse;
import com.google.cloud.speech.v1.SpeechClient;
import com.google.cloud.speech.v1.SpeechRecognitionAlternative;
import com.google.cloud.speech.v1.SpeechRecognitionResult;
import com.google.cloud.speech.v1.SpeechSettings;
import com.google.protobuf.ByteString;

@Service
public class SpeechToTextService {

    @Autowired
    private SpeechSettings speechSettings;

    private final Logger logger = LoggerFactory.getLogger(SpeechToTextService.class);

    public String transcribe(MultipartFile audioFile, int frequency) throws IOException {
        if (audioFile.isEmpty()) {
            throw new IOException("Required part 'audioFile' is not present.");
        }

        // 오디오 파일을 byte array로 decode
        byte[] audioBytes = audioFile.getBytes();
        ByteString audioData = ByteString.copyFrom(audioBytes);

        // 설정 객체 생성
        RecognitionConfig recognitionConfig =
                RecognitionConfig.newBuilder()
                        .setEncoding(RecognitionConfig.AudioEncoding.FLAC) //파일은 FLAC 형식
                        .setSampleRateHertz(frequency) //아이폰 48000, 안드로이드 44100
                        .setLanguageCode("ko-kR") //영어 en-US, 한국어 ko-KR
                        .build();

        // 오디오 객체 생성
        RecognitionAudio recognitionAudio = RecognitionAudio.newBuilder()
                .setContent(audioData)
                .build();

        // 클라이언트 인스턴스화
        try (SpeechClient speechClient = SpeechClient.create(speechSettings)) {

            // 오디오-텍스트 변환 수행
            RecognizeResponse response = speechClient.recognize(recognitionConfig, recognitionAudio);
            StringBuilder transcript = new StringBuilder();
            for (SpeechRecognitionResult result : response.getResultsList()) {
                SpeechRecognitionAlternative alternative = result.getAlternativesList().get(0);
                transcript.append(alternative.getTranscript());
            }
            return transcript.toString();
        }
    }
}
결과 영상
STRecording 앱의 STT 기능 시연 영상입니다.
STT 기능을 사용해 보니, 정확도가 생각보다 높았습니다. 게다가 구글 공식 문서가 잘 정리되어 있어 기능을 구현하는 데 큰 어려움이 없었습니다.
하지만 오디오 파일을 스크립트로 변환하는 데 2~3초 정도 소요되었으며, 한국어와 영어가 섞인 문장은 영어를 제대로 인식하지 못하는 아쉬운 점이 있었습니다.
참고자료
[Spring] Google Speech-to-Text로 오디오 파일을 스크립트로 변환하기
Google Cloud Platform에서 제공하는 Speech-to-Text API를 활용하여 10초 이내의 오디오 파일을 스크립트로 변환합니다 내 프로젝트 환경 JVM 17.0.6 Gradle 7.6 Springboot 3.0.2 시작하기 전에 프로젝트에서 Speech-to-
keepgoin9.tistory.com
Speech-to-Text 문서 | Cloud Speech-to-Text Documentation | Google Cloud
애플리케이션에서 Google 음성 인식 기술을 사용하여 오디오를 텍스트로 변환합니다.
cloud.google.com
'Spring' 카테고리의 다른 글
| [Spring] Redis 테스트 환경 구축하기(Embedded Redis) (2) | 2024.12.31 |
|---|---|
| [Spring] URL 이미지 리사이징 후, S3에 업로드 (3) | 2024.07.28 |
| [Spring] Spring Data JPA 페이징 처리 알아보기 (2) | 2023.10.03 |
| [Spring] Spring Security와 OAuth 2.0으로 구글 소셜 로그인 구현(1) (0) | 2023.08.11 |
| JPA, Hibernate, Spring Data JPA? (0) | 2023.08.06 |
느리더라도 단단하게 성장하고자 합니다!
포스팅이 좋았다면 "좋아요❤️" 또는 "구독👍🏻" 해주세요!
![[Spring] Redis 테스트 환경 구축하기(Embedded Redis)](https://img1.daumcdn.net/thumb/R750x0/?scode=mtistory2&fname=https%3A%2F%2Fblog.kakaocdn.net%2Fdn%2FdVum8F%2FbtsLCFvrnea%2Fv6IzHV7DU5z7V8chqyUWHK%2Fimg.png)
![[Spring] URL 이미지 리사이징 후, S3에 업로드](https://img1.daumcdn.net/thumb/R750x0/?scode=mtistory2&fname=https%3A%2F%2Fblog.kakaocdn.net%2Fdn%2Fbo2ABS%2FbtsIO2hfVoo%2Ff1IgCWhPSGGUvR0smvtdKk%2Fimg.png)
![[Spring] Spring Data JPA 페이징 처리 알아보기](https://img1.daumcdn.net/thumb/R750x0/?scode=mtistory2&fname=https%3A%2F%2Fblog.kakaocdn.net%2Fdn%2FbhD1rG%2FbtswaqUQdQg%2FZQy0NUL7JbzqAT21WbWnOK%2Fimg.png)
![[Spring] Spring Security와 OAuth 2.0으로 구글 소셜 로그인 구현(1)](https://img1.daumcdn.net/thumb/R750x0/?scode=mtistory2&fname=https%3A%2F%2Fblog.kakaocdn.net%2Fdn%2FOabep%2FbtsqVQSJHix%2Fi5OCR15edMy31KCU07G0k1%2Fimg.png)